

Trinnov Altitude CI App Deep Dive: Inside the New Interface
The Trinnov Altitude CI is installed and running in the Techthusiasm reference theater, and the completely rewritten software interface is a massive leap forward for the platform. I've already covered hardware overviews of the Altitude CI preamp and the Amplitude 16 amplifier, plus the installation in video vlogs showing how I got everything wired up. Now it's time to go deeper. This post walks you through the brand new Trinnov software UI — what's changed, how it's organized, and the settings that actually matter when you're tuning a real system.
📺 Watch the full deep dive on YouTube: Awesome Trinnov Altitude CI Software Overhaul Deep Dive | Home Theater Preamplifier
The App Itself: Mac, iPad, and iPhone
The desktop Trinnov app lives in the Mac App Store with additional dedicated versions for iPhone and iPad. The Mac and iPad apps give you full access — every configuration menu, every setting, every graph. The iPhone version is intentionally stripped down to basic command and control: mute, dim, volume, source switching, preset selection. If you want to actually configure or calibrate the unit, you're doing it on Mac or iPad.
I'm running app version 4.3.1 connected to firmware 2.1.1 on my Altitude CI. The app also handles multi-unit households — if you've got Trinnov in multiple rooms, one app connects to all of them and lets you swap between machines.
There's a separate Remote Control view that mimics the iPhone command-and-control interface. You can pop it out and leave it open on the side of your screen if you want a permanent volume and metering window while doing other things. Mute, dim, optimizer bypass, volume, codec display, source switching, preset switching — all right there.
Home Screen: The Command Center
The home screen is your overall system snapshot. Current source, lip sync setting (mine's at 200ms because of the madVR Envy in my chain), active codec, upmixer state, clock, resolution, color space, bit depth — everything at a glance.
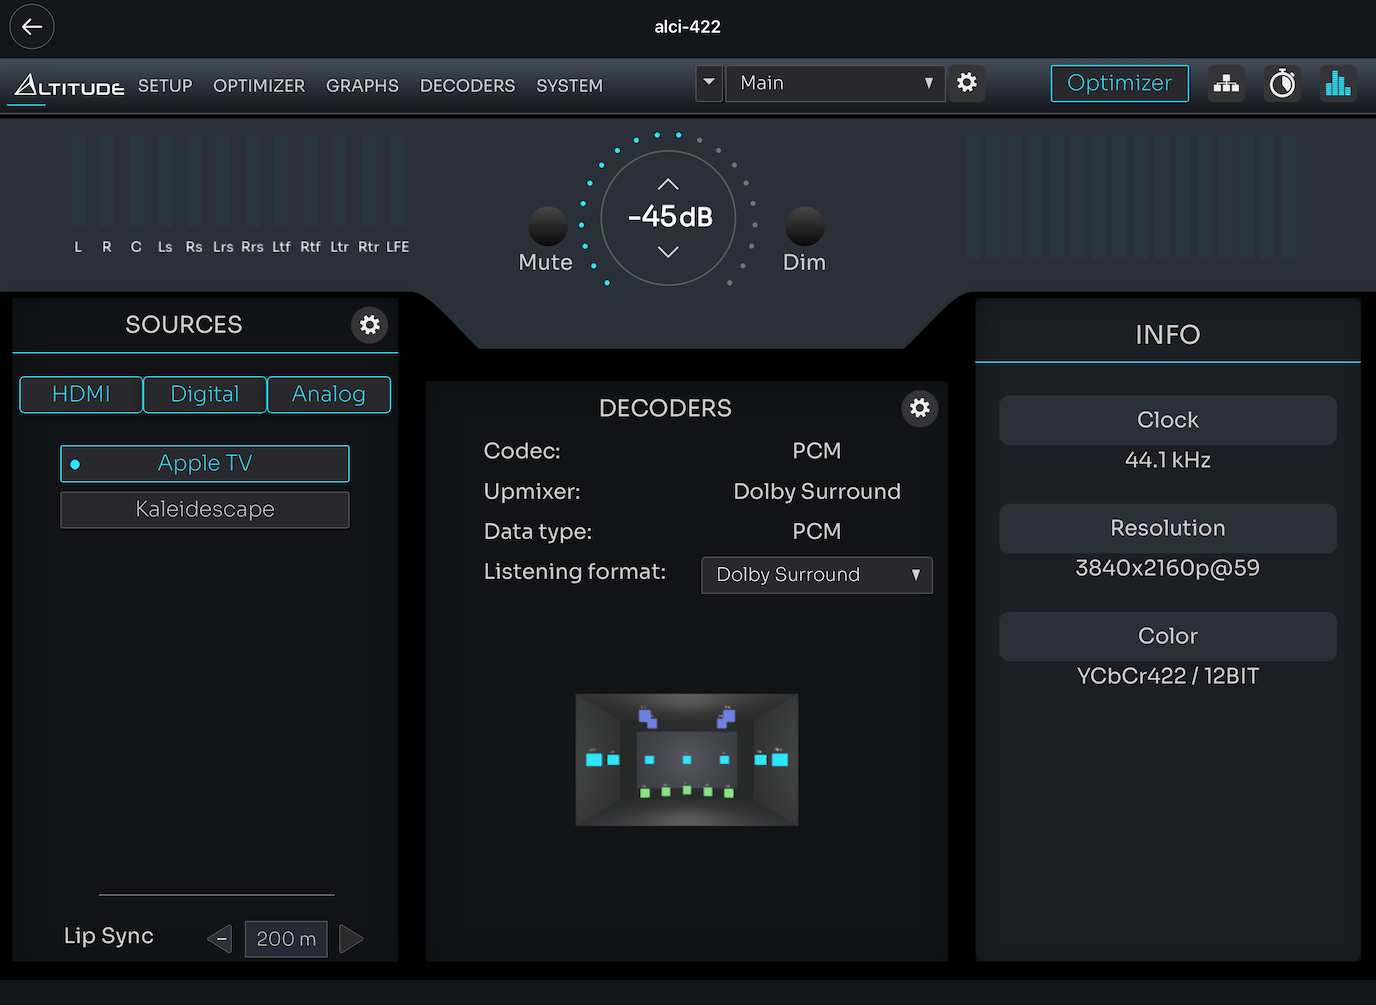
Input and output meters live up top. Click them and you get a larger view comparing in and out side by side, which is genuinely useful for watching what the system is actually doing channel by channel. Mute, dim, and volume controls sit above that.
Presets are accessible right from the home screen. I keep two — my main preset and a dated backup I create whenever I'm about to change settings. You can save a new preset directly from this menu, or jump into full preset management from the system menu.
Setup: Configuration and Calibration
Setup splits into two paths: Configuration and Calibration.
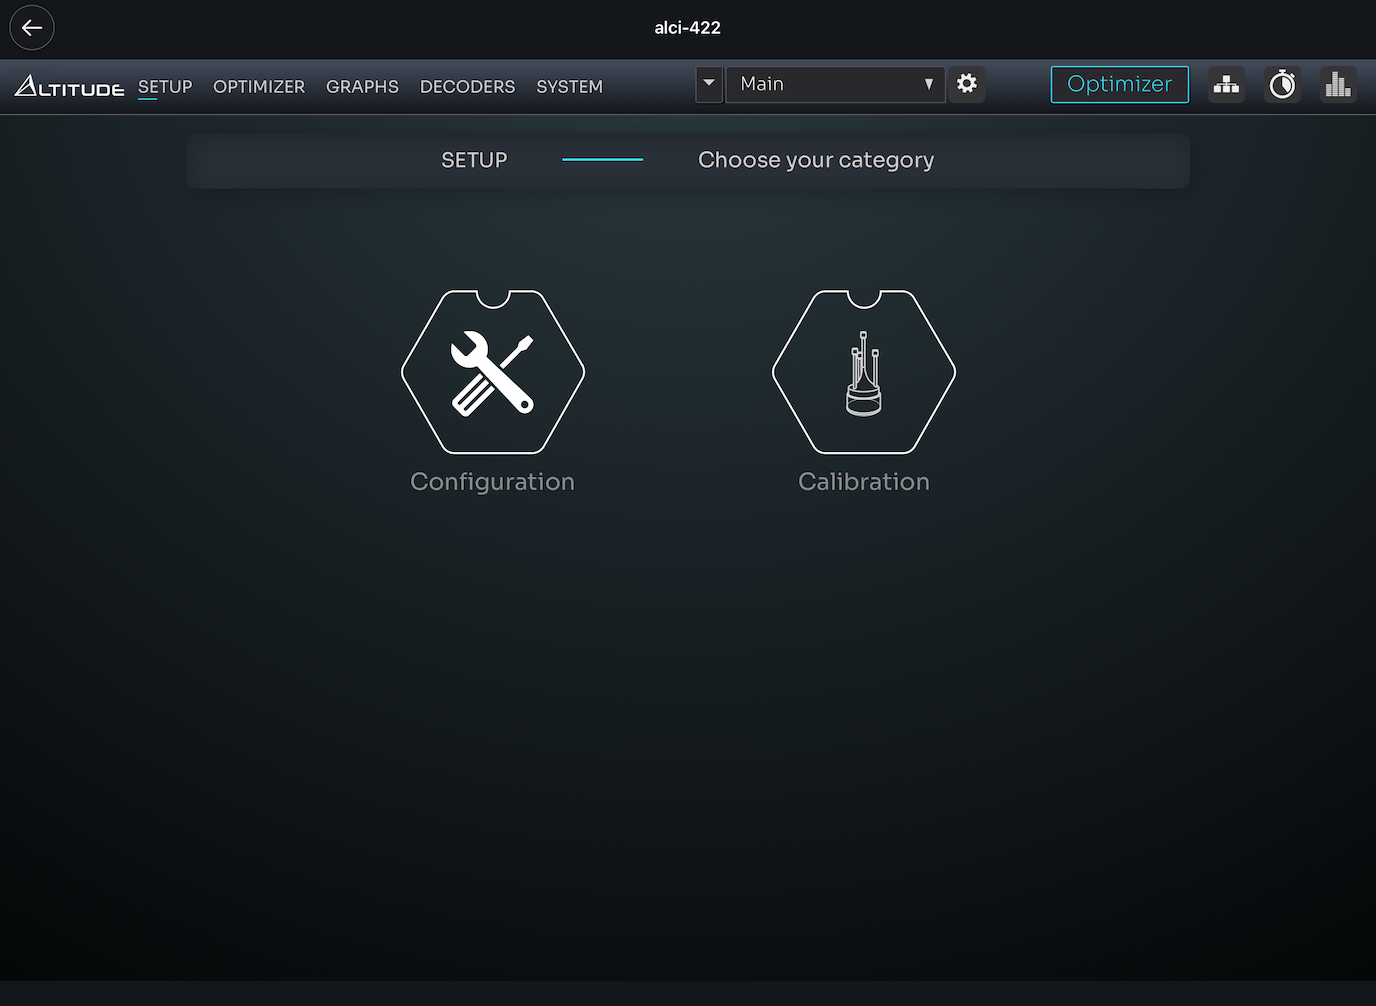
I run Expert Mode across the board. Some of the visualizations change, but more importantly, Expert Mode unlocks the fine control over target curves, filters, and routing that you actually want. Just turn it on.
Speaker and Channel Configuration
The Altitude CI ships with 8 channels by default. I bought four additional channel pairs to get to 16 total, and all 16 are deployed. The configuration screen shows 11 speakers active (highlighted in blue) plus 5 subwoofers.
Routing
This is where the Trinnov flexibility really shows. For each channel, you define amplification configuration (mono, bi-amp, tri-amp, quad-amp) and output type — analog, AES, or Dante. I'm using Dante for 11 speaker channels into the Amplitude 16, with the Dante channel mappings configured behind the scenes between the two units. Subs S1 through S5 are on analog outputs via a DB25-to-XLR breakout cable that Trinnov sells alongside the Altitude CI.
I won't go deep on calibration here — that's getting its own dedicated content soon. But the process flow is: set clocks → validate mic → set levels → take measurements → run calibration → waveforming.
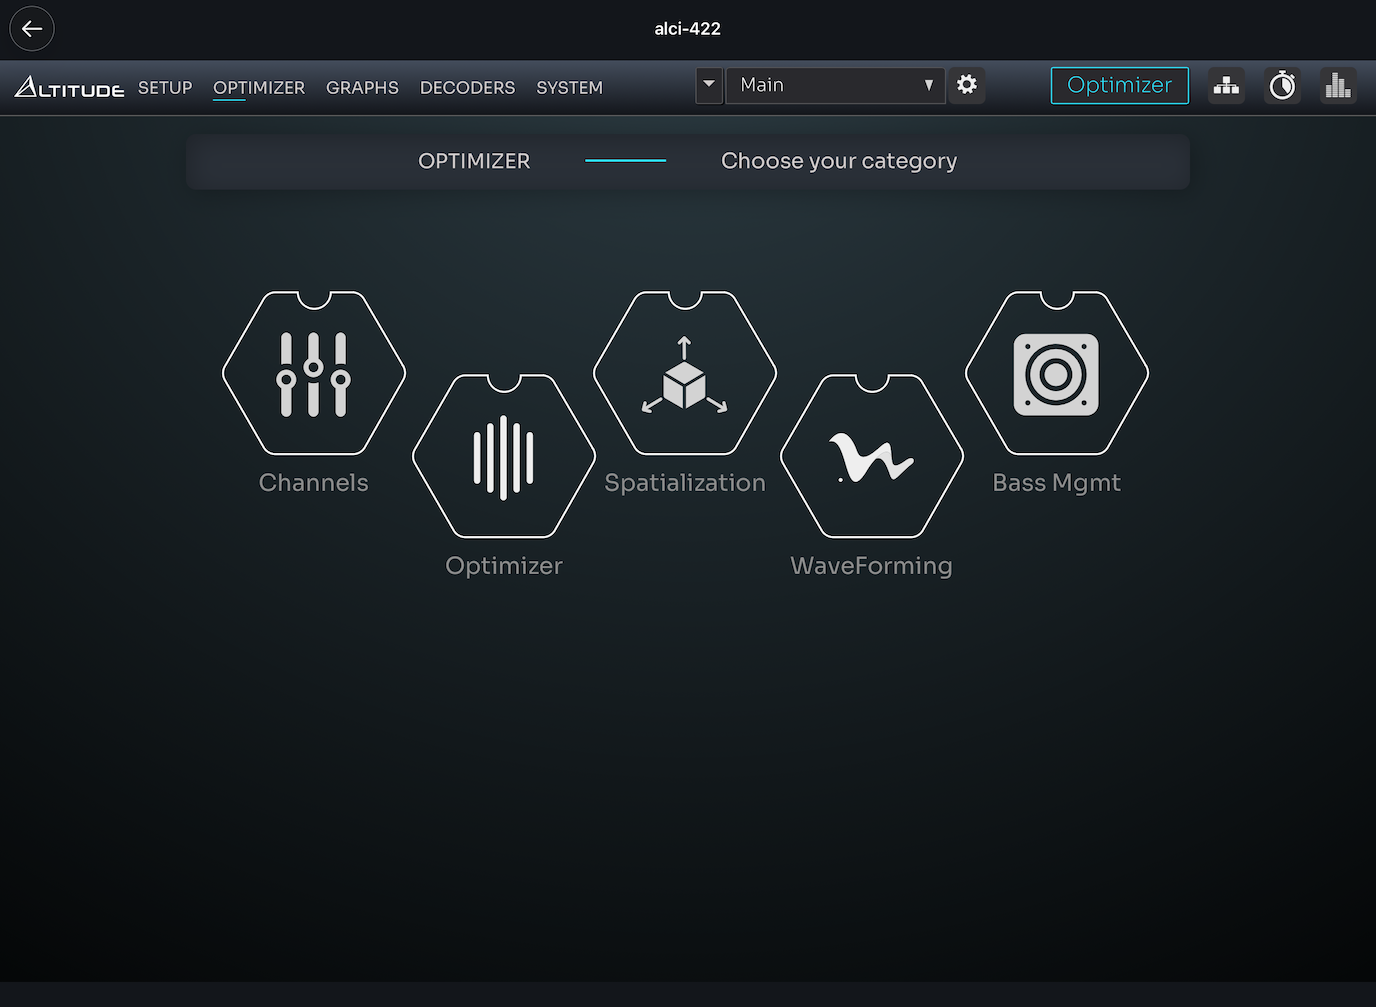
Optimizer: Where the Magic Happens
The Optimizer section is the heart of the Trinnov platform. Three modules — Amplitude, Phase, and Excursion — each independently toggleable, with a center bypass that disables the optimizer entirely.
Target Curves
In Expert Mode you can freely sculpt the target curve. I run something similar to what I had on my Anthem — bass boost with a downward tilt through the higher frequencies. Excursion curves work similarly but govern the allowed behavior of specific speakers and subs. Per Trinnov's recommendation, I'm running a boosted excursion curve.
Weighting
This is one of the most powerful features and one most people probably underuse. Trinnov lets you weight calibration data toward specific seats. I have one row of five. My center seat is my main listening position — that's where I do all my critical listening. So I weight 50% to the center seat and split the remaining 50% evenly across the other four (12% each).
The result: if you sit in my center seat, you get the optimal experience. The other seats still sound excellent — I've sat in all of them and verified — but the center is dialed in. If your usage pattern is different, weight accordingly. You could also create multiple presets with different weightings. I'll probably make a 100%-center-weighted preset for when I'm watching solo.
Summary and Settings
The summary view shows the system's spatial understanding of your speakers — calculated elevation, azimuth, distance from the measurements. Settings let you control optimization mode, filter type, and resolution. Helpful contextual information appears at the bottom of some panels explaining what each option does. Not everywhere yet, but it's a big improvement over the old interface.
Spatialization and Remapping
Here's a genuinely advanced feature: you can remap speakers in 2D and 3D space. I'm not currently using this, but I'm considering it. My overhead speakers cluster a little tighter than ideal, and I might end up using remapping to virtually widen them. I have a similar potential application for moving my side surrounds slightly forward of their physical position.
Waveforming: The Subwoofer Game-Changer
Waveforming is a Trinnov flagship feature and I'm running it in full. Five subwoofers, three across the front configured as emitters, two in the back as absorbers. All are the same make and model (matched subs are important for waveforming to work well) using SVS SB17-Ultra units.
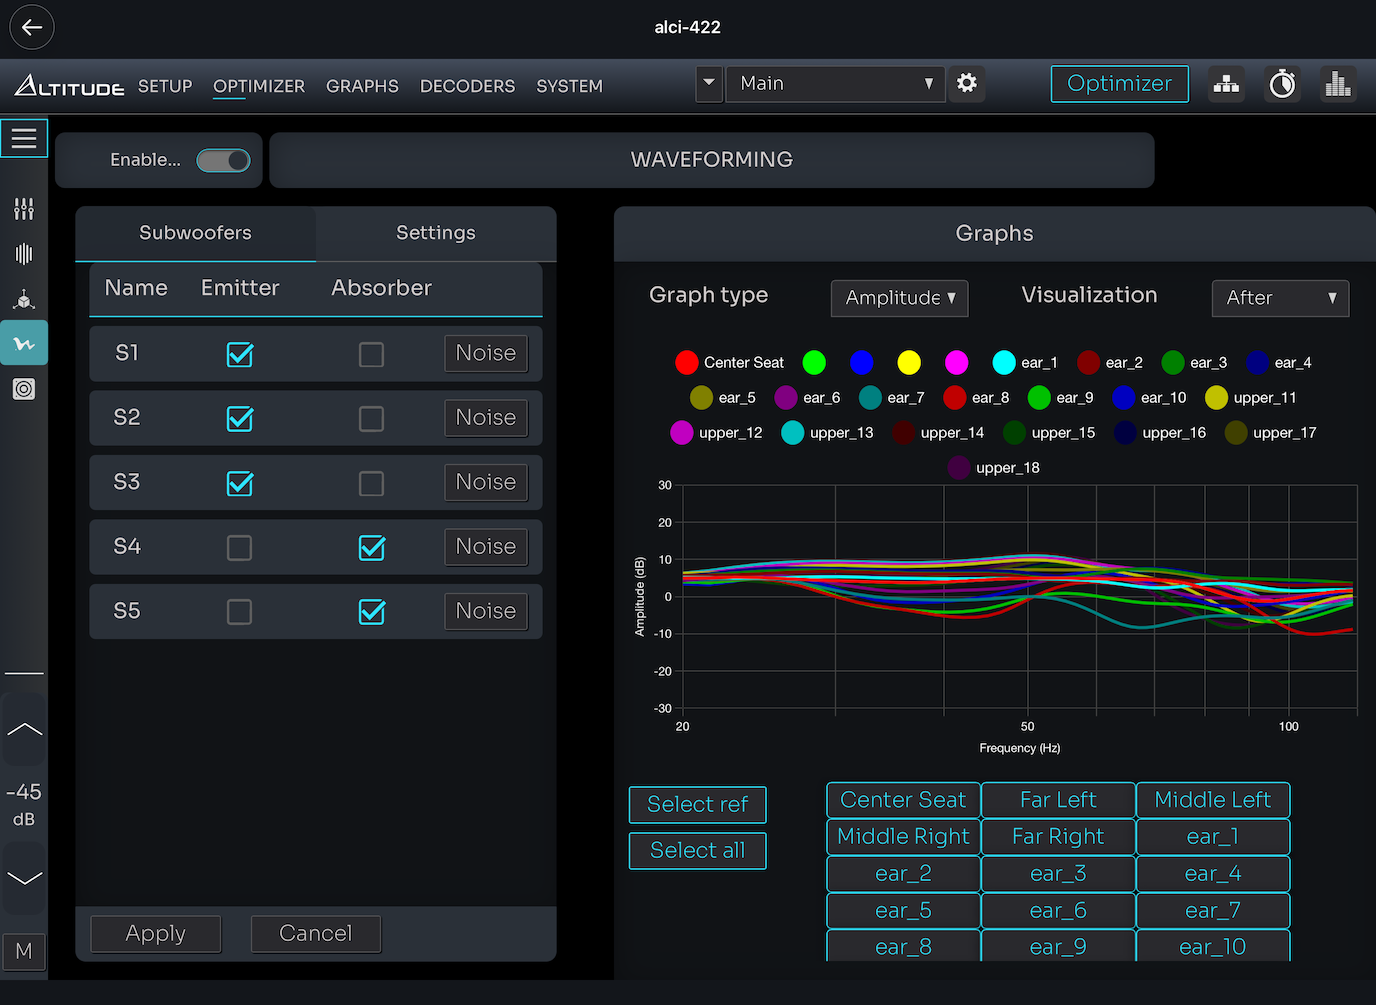
The app gives you multiple visualizations of what waveforming is doing in your space, plus settings you can adjust. It includes pop-up explanations for each mode, which is welcome — these aren't intuitive concepts on first encounter.
Heads up on calibration time: waveforming adds significant measurement overhead. In my room with five seats, that's 18 measurement points. Thankfully it only measures the subs, not every speaker. But budget the time — it's absolutely worth it for the result.
Bass Management
Bass management is critical and the Trinnov gives you serious control. One thing worth flagging: Trinnov does not automatically calculate your crossovers. It expects you (or your dealer/installer) to enter the correct crossover values based on your speakers' actual capabilities. Then it measures and applies accordingly.
For my system, I'm crossing the Focal 1000 Utopia LCRs lower than the rest because they're large and capable. Side and rear surrounds cross at 80 Hz. The upper Atmos speakers cross higher because they're smaller concentric drivers.
You can control crossover type, slope, and frequency for each group. There are also options to apply additional gain to specific subs if needed.
The Full Matrix
For the advanced users: the full matrix gives you complete control over which speakers route bass to which subwoofers. If you want to send only the left main's LFE content to the front-left sub, you can. I'm not doing any advanced routing currently, but the capability is there.
Graphs: Visualize Everything
The graphing system is dramatically improved. You can view before-and-after of your room response, see the filters being applied, enable or disable specific speakers from the view, look at amplitude, phase, impulse response, and various group delay measurements.
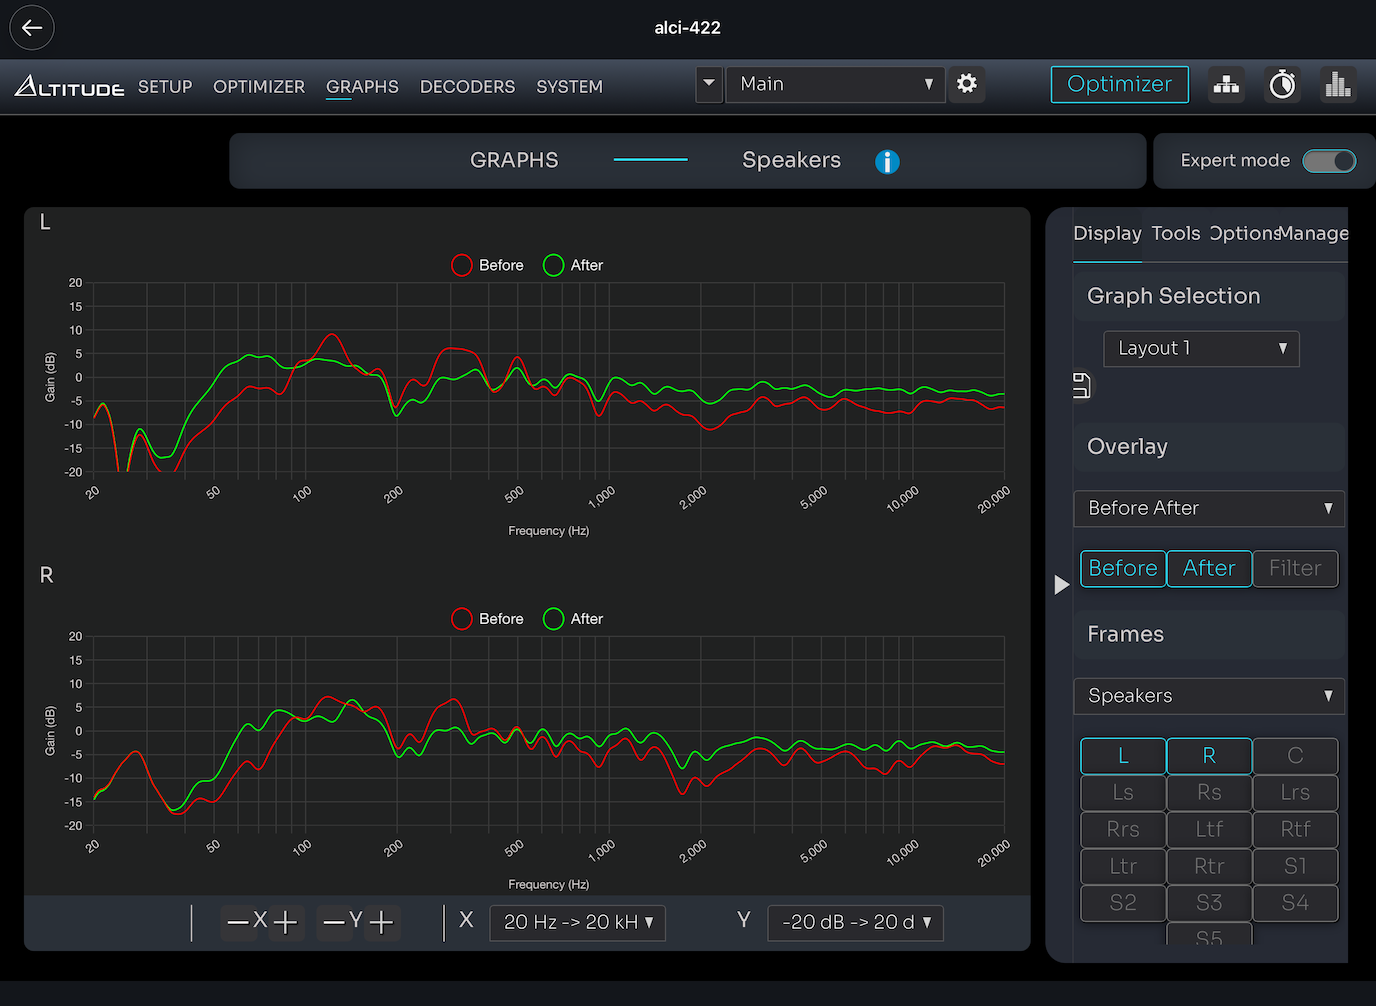
You can compare measurements against each other — different seat positions, different speakers — and save custom layouts for views you return to often.
My favorite element: dynamic markers. Hover anywhere on a plot and it tells you exact frequency and gain at that point. A surprising number of measurement tools — including Anthem's — don't give you this, and you end up squinting and guessing. Small thing, but it matters when you're doing real analysis.
Decoders
The decoders section controls Dolby, DTS, and Auro behavior. You can manage speaker and channel mappings within each decoder if you have advanced needs, and choose your PCM upmixer. I'm using Dolby Surround as my upmixer — that's my personal preference.
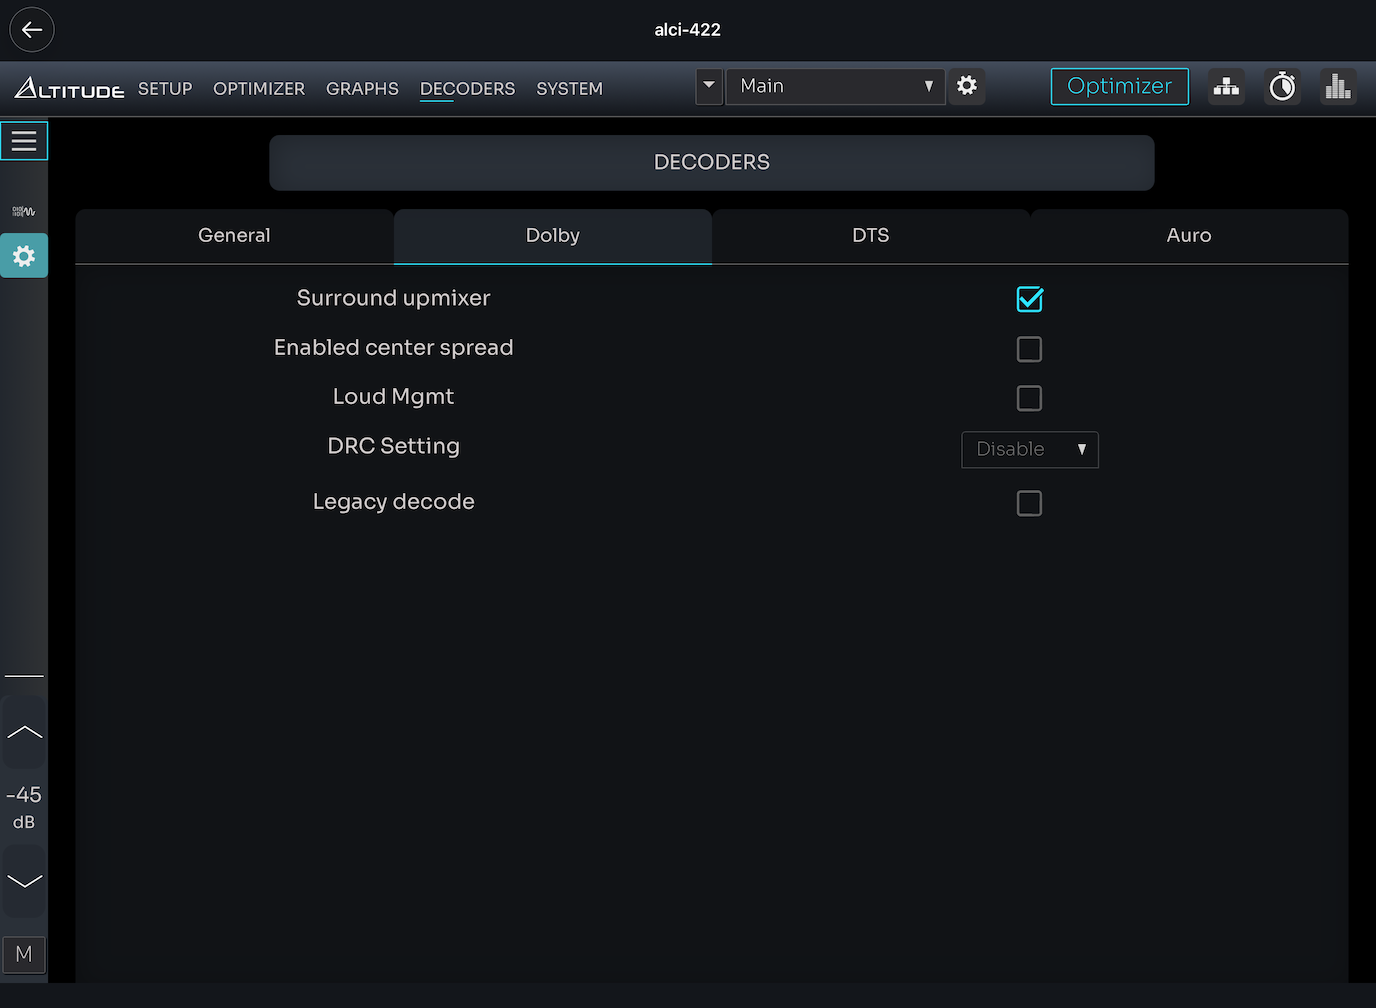
Each codec has its own settings panel. This is one area where I'd love to see more contextual help text — some of these options aren't self-explanatory. You can find documentation, but having it inline would be ideal.
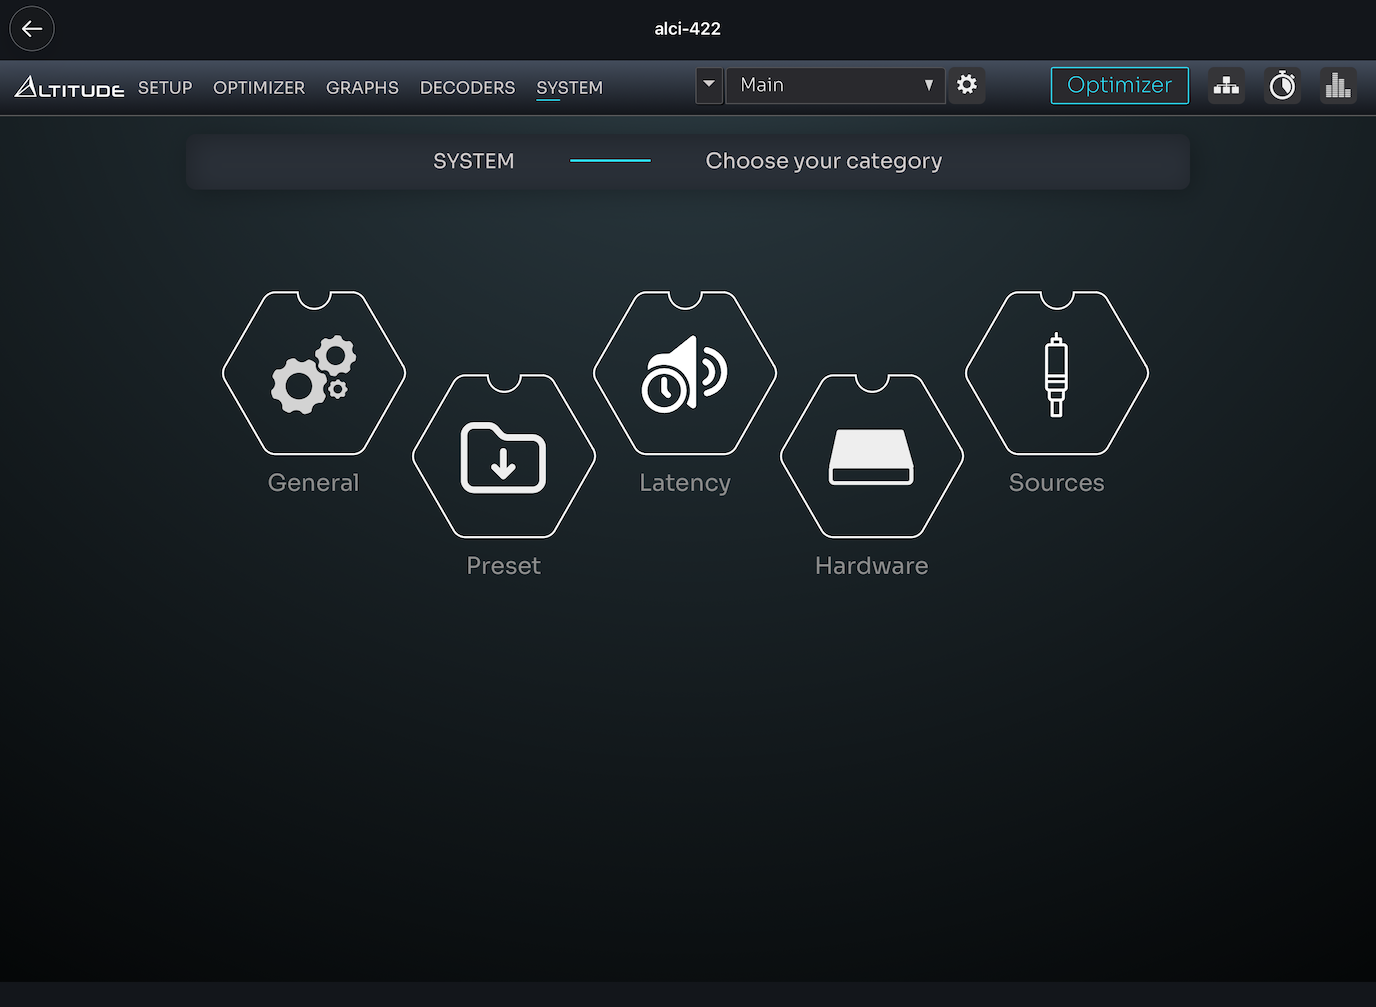
System Menu: The Catch-All
The system menu is where everything else lives.
General handles power management and startup preset selection. I run network standby because Control4 is managing the unit.
Preferences lets you rename the unit, configure triggers, and adjust visualizations. There's a textured background option I leave off — cleaner this way.
Front Panel controls the meter display, brightness, screensaver, and the front panel LED. Mine's set low. Even at 5 it's bright. None of this matters in my install because the equipment is racked, but if your gear is visible to the room, you'll want the controls.
Volume sets maximum volume and dim attenuation. The dim function is genuinely useful — it's a quick attenuation without full mute. When I'm running demos and jumping between scenes, I might start a demo dimmed so I don't blast guests, then bring it back to reference once the scene settles in. Way more elegant than constantly riding the volume knob.
Presets is where you really define the overall system behavior set. Import, export, duplicate, lock, delete. The export capability is great for off-machine backup — highly recommend doing this after a successful calibration.
Latency is where I set my 200ms master delay for the madVR Envy in my video chain. The right side shows you processing latency the system calculates for itself.
Hardware gives you real-time CPU, memory, and DSP load monitoring. It's also where the factory reset lives. Don't press that one by accident!
Sources is powerful. You can define virtual sources, link them to inputs, and configure per-source settings: listening format, audio format, preset loading, triggers, and — critically — default volume. I have mine set to load -45 dB on source switch. It's audible but quiet, which means no one ever gets blasted by audio that was left at reference from a previous demo. If you're not using this feature, start.
HDMI handles the four 2.1-capable inputs and two outputs. EDID management is here, including the EDID auto lip sync option. I tried using auto lip sync instead of my own manual delay and found it didn't lock on reliably with the madVR in the chain. Manual delay is more deterministic — I recommend it.
Key Takeaways
The new Trinnov app is a significant overhaul — far more usable, more accessible, better organized than the previous interface.
Mac and iPad give you full configuration access; iPhone is command-and-control only.
Expert Mode unlocks the controls you actually want — turn it on and leave it on.
Weighting lets you optimize for specific seats — don't ignore it.
Waveforming with matched subs is transformative for bass response — worth the extra calibration time.
Trinnov does not auto-calculate crossovers — you set them based on your speakers' actual capabilities.
Per-source default volume is a feature everyone should use.
Dynamic markers on graphs make analysis genuinely easier.
The Result
The Altitude CI is a definitive upgrade. Bass is more present, the soundstage is more integrated, everything feels more natural. The combination of waveforming and the Trinnov Optimizer is punching through the challenges of the room and pulling the full performance out of my speakers and subs. I'm a fan!
Let's Talk Home Theater
If you're considering a Trinnov upgrade — or anything else in your home theater journey — I'd love to help. I carry the full lineup: Kaleidescape, madVR, JVC, Sony, Epson, Seymour, SVS, Perlisten, Focal, Trinnov, Denon, Marantz, and more. Speakers, projectors, screens, processors, amps, media servers — the whole stack. Get in touch today!