

Introducing the Trinnov Altitude CI Preamplifier
Trinnov Altitude CI Unboxing: The Ultimate Audio Upgrade Has Arrived
The Trinnov Altitude CI is here — and it's going straight into the Techthusiasm home theater. This is the one I've been waiting for. Brand new hardware, brand new software, brand new interface, and I'm one of the first integrators to have it in hand. I picked up the 16-channel version, added the new 3D calibration microphone, the remote, and a couple of key accessories, and we unboxed the whole thing on camera so you can see exactly what you're getting into.
If you're planning a serious home theater upgrade — or you're a custom integration client wondering what Trinnov is all about — this post is for you. Let's get into it.
📺 Watch the full unboxing video on YouTube: Trinnov Altitude CI First Look & Unboxing
What Is the Trinnov Altitude CI?
The Altitude CI is Trinnov's brand-new AV preamp/processor built specifically for the custom integration (CI) market. It's not a revision of the Altitude16 or Altitude32 — it's a new platform, built with a completely different philosophy: modular, scalable, and fully networked via Audio-over-IP.
Here's the core concept. The Altitude CI ships as an 8-channel base unit, and from there you unlock additional channels in 2-channel software increments — all the way up to 32 channels standard, with a 64-channel custom option arriving in 2026. I went with the 16-channel configuration, which is exactly what I need for the Techthusiasm theater: a 7.5.4 immersive audio layout using all 16 channels of this beast.
Those channel upgrades? Done remotely. No truck roll, no shipping the unit back. That's a big deal for integrators and a real long-term value play for owners.
Altitude CI vs. Altitude16 / Altitude32 — What's the Difference?
The traditional Altitude line — the 16 and 32 — remain the reference standard with fixed hardware configurations and a rich analog I/O setup. The CI takes a different approach: it trades some of that analog I/O density for a deeply networked, AoIP-first architecture. They coexist in the Trinnov lineup as tools for different types of builds. If you want to dig deeper on where the Altitude16 fits, check out the Techthusiasm channel for more Trinnov coverage.
Inside the Box: Everything That Came With the Altitude CI
The packaging itself tells you something. Double-walled cardboard, heavy protection — this thing didn't ship on a pallet via FedEx but it was protected like it did. Everything was organized and accounted for inside a single outer box, which surprised me a little since the microphone and accessories are technically add-ons. But it was all there, clean and ready.
Here's a breakdown of what's in the kit:
The Altitude CI Unit Itself
Comes wrapped in a cloth bag and looks sharp. This is a meaningful aesthetic upgrade from previous Trinnov hardware — brushed front panel, clean lines, integrated feel. Trinnov has done what madVR did with its more recent hardware revisions: made the device look like it belongs in a premium install rather than a server room. It's a 2RU chassis, not super deep, not super heavy — very manageable for rack installation.
New Trinnov 3D Calibration Microphone
This is the brand-new version of the Trinnov microphone — same basic multi-capsule array concept, but with improved connectivity and a simpler workflow for loading calibration files into the system. The microphone connects to a dedicated port on the Altitude CI itself (not your laptop — important distinction for anyone who's used other calibration systems). The cable included is long — easily enough to reach from seated positions in most theater setups back to a rack in an adjacent room.
The mic comes in a nice carry case with a suspension mount that attaches to any standard microphone stand. No stand is included, but if you've already been running calibrations with Anthem, Dirac, or any other system, you likely already have one. This kit stays protected and accessible for follow-up calibrations down the road.
Remote Control (Add-On)
The remote is an optional accessory — additional cost — but I added it to have the full experience. It's got a solid, hefty feel to it with dedicated buttons for source selection, format switching, and engaging the Optimizer. There's a coin battery (not pre-installed) and a locking screw on the battery compartment door. Probably not something I'll reach for daily given how my system is set up, but it's nice to have as a fallback.
DB25-to-XLR Breakout Cable (Add-On)
The Altitude CI uses a DB25 connector for its 8 analog outputs — this is standard pro audio (Tascam pin-out), completely normal in the professional world, but something to plan for if you're coming from a traditional consumer AV processor. This breakout cable splits the DB25 into 8 individual XLR connections for routing to external amplification.
In my case, I'm not using analog for the main channels — I'm running Audio-over-IP via Dante to the Amplitude16 for everything except the subwoofers. The subs connect via this analog breakout. I have five subwoofers in the Techthusiasm theater, so that accounts for five of the eight analog outputs, with three left over. This cable is not included with the Altitude CI — there are several variants depending on your connection needs, so spec the right one for your build.
Power Cord, Rack Ears, IR Receiver, and SFP Transceiver
The included power cord is a standard three-prong grounded cable. Rack ears are in the box — no need to buy additional hardware to mount this in a standard rack. There's a small IR receiver module for installations where the unit needs to receive IR commands from a remote in a different location. And the SFP transceiver module — which is a Ubiquiti unit — is there for the Audio-over-IP network connections (more on that in a minute).
Documentation
Quick start guide in two languages, warranty info, and basic setup instructions pointing you to the Trinnov app. Clean, minimal, professional. The real depth of setup documentation lives in the app and the web interface.
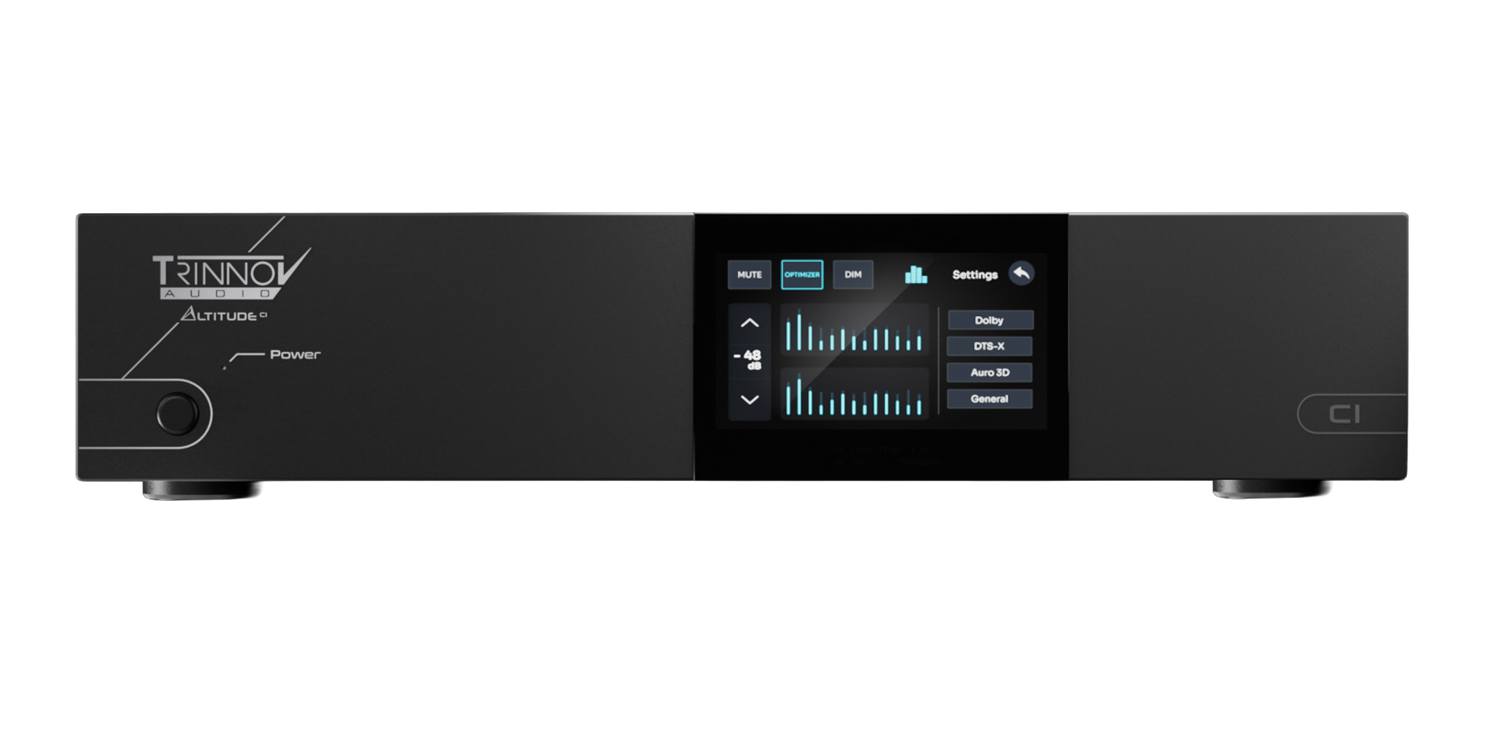
Hardware Walkthrough: Front Panel
The front of the Altitude CI is genuinely impressive. Brushed metal finish, clean and modern. The centerpiece is a 5-inch display that's also a touchscreen — and I want to be clear, it's not just a display with buttons around it. There are no buttons. Everything — source selection, format switching, Optimizer engagement, all of it — is managed through that touchscreen when you're at the rack. It's the only interface on the front panel, and it works cleanly.
You'll also notice fan grilles — top and both sides, so three fans total. For a rack install or a dedicated equipment room, this is a non-issue. Even in a shared space, I'd expect the noise to be very manageable, but that's something we'll report back on once it's running in the system.
And one thing that really stood out to me: the rack space savings here are significant. Going from my dual NAD M28 / Anthem AVM90 setup — three devices — to just two units (Altitude CI + Amplitude16) recovers a meaningful amount of vertical rack space. That matters in a real install.
Hardware Walkthrough: Rear Panel — Left to Right
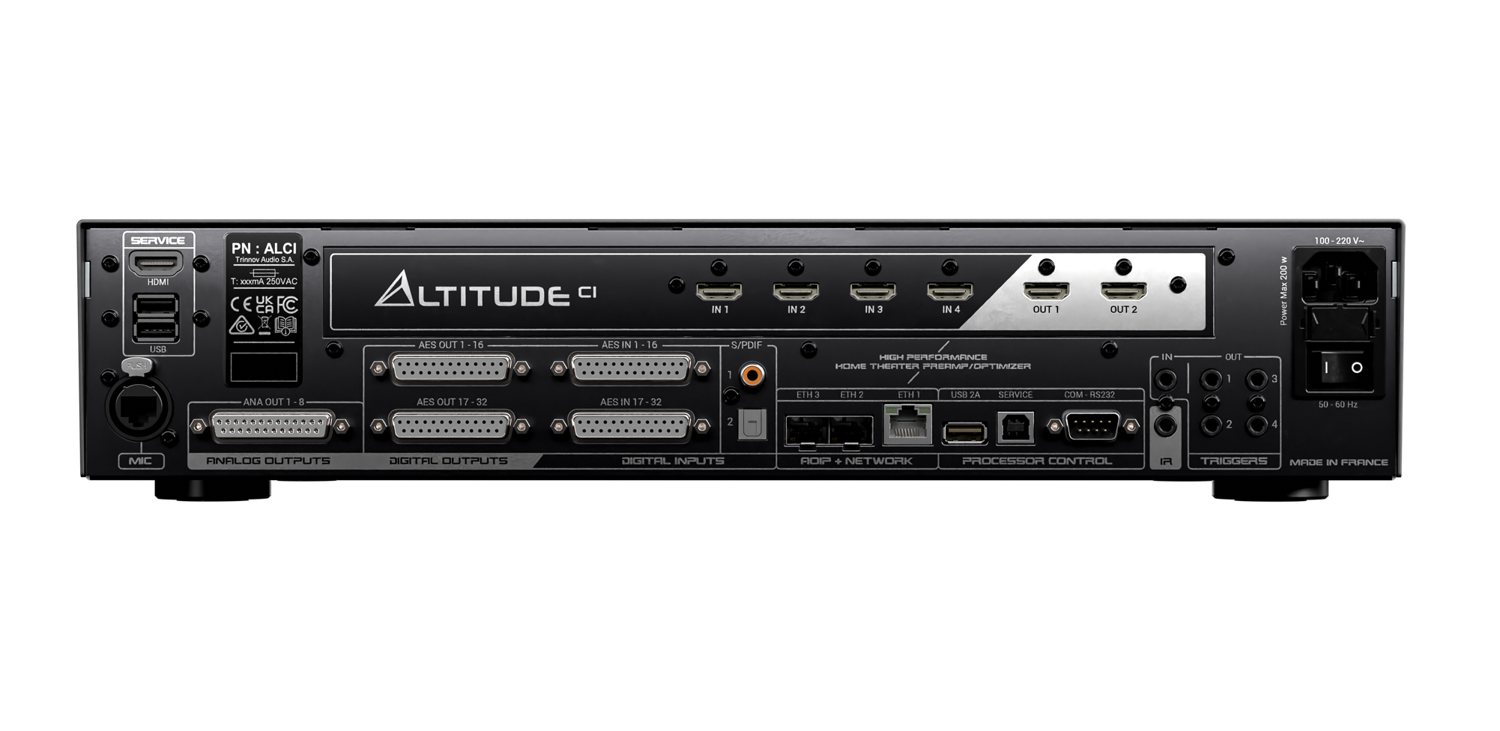
This is where the Altitude CI gets interesting. Let me walk through the back panel the same way I did in the video.
Service Ports
Far left: HDMI service port and dual USB. These are for system diagnostics and service-level access — not regular user connections.
Microphone Input
The dedicated mic port uses an XLR-looking circular connector — it's not a standard XLR, it's a network-style connection for the new Trinnov 3D mic. The new cabling makes this connection simpler and more reliable than previous Trinnov mic setups.
HDMI Board
4 HDMI inputs, 2 HDMI outputs — HDMI 2.1 spec, high bandwidth, 8K/60 and 4K/120 capable. For my setup: Kaleidescape Strato and Apple TV in, single HDMI output to the projector. Four inputs is good for many installs — if you're running a full video matrix, plan accordingly. Two outputs gives you flexibility for a second display or a video distribution path.
DB25 Analog and Digital I/O
Several DB25 connectors handle the analog and AES digital audio. Analog Output 1–8 is where that breakout cable connects for subwoofer and/or external amp connections. There are also AES/EBU digital outputs and inputs via DB25 for connecting compatible digital amplifiers — a powerful option if you're building a fully digital signal chain without going full AoIP.
Network Ports — The AoIP Infrastructure
This is one of the defining features of the Altitude CI platform. You get:
Ethernet 1 (RJ45) — standard network connection for home network, control, app access, and Trinnov extranet
Ethernet 2 & 3 (SFP) — dedicated Audio-over-IP ports for Dante
Those SFP ports are what connect the Altitude CI to the Amplitude16's optional Dante input board. The connection uses an SFP transceiver (that Ubiquiti module from the accessory bag) and a standard copper cable — not fiber, despite the SFP form factor. The three independently configurable Ethernet ports let you separate control traffic, audio streaming, and service traffic onto different network lanes. That's a pro-level network architecture in a home theater processor.
The Altitude CI is the first processor in its class to natively support both Dante® and Ravenna®/AES67 — meaning it integrates cleanly with both consumer and professional audio infrastructure.
Legacy Audio Inputs
Two coaxial digital inputs and one optical (TOSLINK) — for legacy sources or simpler system configurations.
Control and Automation
RS232, USB (service/control), IR input (for that included IR receiver), and four trigger outputs plus one trigger input. With a high channel count system potentially driving multiple amplifiers, having four discrete trigger outputs is genuinely useful — one per amp if you need it. Control platform support includes Crestron, Savant, Control4, RTI, AMX, and others with certified drivers.
Power
A voltage selector switch (for international use, 50/60Hz regions) and the three-prong IEC power inlet. Clean, simple, professional.
Trinnov's Processing Tech: What's Running Under the Hood
The Altitude CI ships with Trinnov's complete suite of acoustic processing — the same technology that's earned the brand its reputation in professional studios and reference home cinema installations worldwide.
Trinnov Optimizer™
This is the core of what Trinnov does. The Optimizer is a 3D room and speaker correction system — not just frequency EQ, but full calibration of phase, timing, levels, and delay for every speaker in the system. In a home theater context, when it's properly dialed in, it produces a soundstage coherence that other calibration systems genuinely can't match.
WaveForming™
Introduced in late 2023 and still ahead of the industry, WaveForming is Trinnov's low-frequency optimization system. Instead of correcting bass problems reactively, it actively works to eliminate room modes and deliver consistent, controlled bass across multiple listening positions. With five subwoofers going into the Techthusiasm theater, this is exactly the technology that pulls that kind of multi-sub system together into something cohesive.
Remapping™
Real rooms don't always accommodate ideal speaker placement — that's just the reality of custom installation. Remapping ensures that immersive audio formats (Dolby Atmos, DTS:X Pro, Auro-3D) render accurately even when speaker geometry doesn't match the format's ideal geometry. For custom integrators, this is the difference between a system that sounds right and one that sounds like a compromise.
Format Support
Full decoding for Dolby Atmos, DTS:X Pro, Auro-3D, and IMAX Enhanced. 64-bit floating-point processing at up to 192kHz. This platform has the processing headroom for whatever formats and updates come next.
The New Altitude Software Platform
Trinnov has done a full redesign of the Altitude user interface for the CI generation. The new software includes a guided calibration workflow — a step-by-step setup process that makes Trinnov's deep toolset significantly more approachable without removing any of the expert-level control. The Trinnov app (iOS, Android, macOS, Windows) and web interface have both been updated as part of this new platform generation.
If you've configured an Altitude16 or 32 before, you know the power is immense and the learning curve is real. The new UI is a meaningful quality-of-life improvement — and for first-time Trinnov owners, it's a much better starting point.
What's Coming Next: The Build-Out Begins
The Altitude CI is in hand. The Amplitude16 is right behind it — that unboxing video is up next on the channel. After that, we're getting into the installation: racking everything up, making the AoIP connections, configuring the network, running the calibration, and getting this system singing in the Techthusiasm theater.
The plan for the Techthusiasm home theater:
7.5.4 audio layout using all 16 channels
Audio-over-IP (Dante) from Altitude CI to Amplitude16 for all speaker channels
Analog outputs via DB25 breakout for five subwoofers
Sources: Kaleidescape Strato and Apple TV via HDMI
Network: Dedicated SFP connection for AoIP, RJ45 for home network and control
Subscribe to the channel so you don't miss a single step of this build: youtube.com/@Techthusiasm
Key Takeaways
The Trinnov Altitude CI is a new platform — not a replacement for the Altitude16/32, but a CI-focused AoIP-first processor with modular channel licensing
Ships as an 8-channel base unit; add channels in 2-channel software increments up to 32 (64 in 2026) — remotely
2RU chassis with 5-inch touchscreen front panel, brushed metal finish — a genuine aesthetic upgrade
Rear panel: 4-in/2-out HDMI 2.1, 8 analog outputs via DB25, AES/EBU digital I/O, 1x RJ45 + 2x SFP Ethernet, coax and optical inputs, RS232/IR/USB control, 4 trigger outputs
Native Dante® and AES67/Ravenna support — first processor in its class with both protocols natively
Full Dolby Atmos, DTS:X Pro, Auro-3D, IMAX Enhanced decoding; 64-bit floating-point at up to 192kHz
Trinnov Optimizer™, WaveForming™, and Remapping™ included standard
Microphone, remote, and DB25 breakout cables are add-on accessories — plan accordingly
New redesigned Altitude UI with guided calibration workflow
Pairs with the Amplitude16 (with optional Dante board) for a fully digital end-to-end AoIP system
Interested in Trinnov for Your Home Theater?
Whether you're spec'ing a new dedicated theater, upgrading an existing system, or just starting to explore what reference-level processing actually sounds like — I'm happy to consult, advise, and make it happen. Trinnov, Kaleidescape, SVS, Focal, Perlisten, JVC, Epson, Stewart Filmscreen, madVR — if it's in the Techthusiasm lineup, I can get it to you with the support to back it up. Get in touch today!